I have now at long last finished all of my hedges and to celebrate this I thought that I would post it here on the blog...
All my hedges are based on K & M Terrain's medium sized hedge...they seem to be between 15 and 20mm tall and approximately 6inches long...there is some variation but not enough to worry about.
I tried a few other materials before settling on K&M but I have found that K&M give the best choice of colour,they are very strong and bendy.
Things you will need...

K&M hedges or similar.
Balsa wood sheeting.
Balsa wood 'D' shaped dowelling... as you will see from the pictures this isn't a proper 'D' it is about 15mm wide and about 17mm high... If you can't find this shape rectangular would be perfectly acceptable and you can of course change the size to suit your needs.
UHU or similar glue.
PVA.
Light weight polyfiller ...I found this a few years ago and I love the stuff ... it is exactly what it says it is... if you imagine someone has whipped up ordinary filler and put a lot of air in it... it doesn't warp bases and it has a nice texture.

I cut my Balsa to the appropriate size...it is useful to draw any irregular or curved shaped lengths out first...

The dowel is then cut and glued down using PVA...
Curves and corners are easily made with some inventive cutting...

At this point some of the hedges will need to be bent to shape so they can fit on the dowel...


The dowel and a suitable amount of Balsa are now cut out and the base is beveled...
A groove is now cut into the top of the dowel ...this should be deep enough to accept the wire core of the K&M hedge...


The K&M hedge is now glued into the groove using UHU..
The next bit is texturing...
I know everybody has their own way that suits their terrain and collections,but I will run through what I like to do...
The first thing I do is apply the light weight filler to the base and up the sides of the dowling...
I then take a damp brush ... an old size 2 is what I use...when I say damp I mean damp... if you put to much water on this stuff it just breaks down to almost nothing...
So I take a damp brush and use it to make branch like shapes near the hedge... they can be quite crudely done...

Once I am satisfied I stipple the rest of the base with my stippling brush...yes I have one just for bases and small bits of terrain...
Once dry I paint and dry brush the groundwork to match my gaming boards and add the appropriate grass and undergrowth foliage...

The base coat is applied ...
The colour I used was a Wilko's colour called Earth Stone... but I am sure there are many other suitable colours available...

Everything is dry brushed with shades of dark and light sand...

Some static grass/floral clumps are added to represent various kinds of undergrowth...

Then everything is flocked in my usual way...

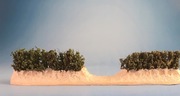
The finished hedges...
And no one is happier than I am that they are finished... I could probably have planted seeds and grown them faster...
I hope that this has been of interest and of some use...
I have also been doing some painting... but more of that later...
All the best. Aly.
A very nice job indeed!
ReplyDeleteThank you Phil
DeleteInteresting, but too much effort and time needed for me, so I’ll stick to my Last Valley hedges.
ReplyDeleteHi David...
DeleteIt did indeed take much longer than I thought it would...but I am very pleased with the results.
I've made some hedges, but more for a formal garden. I'll keep your method in mind for expanding into something more rustic. Thanks for posting!
ReplyDeleteHi Ed...
DeleteI probably could do with some more formal hedges...but I think I shall wait until I have a manor house to go with them